

RedHatは2025年最新のEX200日本語サンプル問題は信頼され続けるEX200日本語テストエンジン
無料お試しRedHat EX200日本語問題集PDFは必ずベストの問題集オプションを使おう
質問 # 61
/ etc / fstabを/ var / tmp name adminにコピーします。user1は読み取り、書き込み、および変更できますが、user2は許可なしでアクセスできます。
正解:
解説:
# cp /etc/fstab /var/tmp/
# chgrp admin /var/tmp/fstab
# setfacl -m u:user1:rwx /var/tmp/fstab
# setfacl -m u:user2:--- /var/tmp/fstab
# ls -l
-rw-rw-r--+ 1 root admin 685 Nov 10 15:29 /var/tmp/fstab
質問 # 62
システムにはローカルシュリンクボリュームがあり、その名前はシュリンクで指定され、VGSRVボリュームグループに属し、/ shrinkディレクトリにマウントされます。サイズの定義は320 MBです。
要件:
データを失うことなく、論理ボリュームを220 MBに減らします。サイズは、縮小後に200〜260 MBの間で許可されます。
正解:
解説:
cd;umount /shrink
e2fsck -f /dev/mapper/vgsrv-shrink
resize2fs /dev/mapper/vgsrv-shrink 220M
lvreduce -L 220M /dev/mapper/vgsrv-shrink
mount -a
質問 # 63
パート2(Node2サーバー上)
タスク8 [システムパフォーマンスの調整]
推奨される調整済みプロファイルを使用するようにサーバーを設定します
正解:
解説:
[root@node2 ~]# tuned-adm list
[root@node2 ~]# tuned-adm active
Current active profile: virtual-guest
[root@node2 ~]# tuned-adm recommend
virtual-guest
[root@node2 ~]# tuned-adm profile virtual-guest
[root@node2 ~]# tuned-adm active
Current active profile: virtual-guest
[root@node2 ~]# reboot
[root@node2 ~]# tuned-adm active
Current active profile: virtual-guest
質問 # 64
1つのドメインRHCEがラボで構成され、ドメインサーバーはserver1.example.comです。 nisuser2001、nisuser2002、nisuser2003ユーザーがサーバー192.168.0.254:/rhome/stationx/nisuser2001に作成されます。 NISユーザーがシステムにログインするときに、ホームディレクトリが自動的にマウントされるようにしてください。ホームディレクトリは、サーバー/ rhome / stationx /で個別に共有されます。xはステーション番号です。
正解:
解説:
see explanation below.
Explanation
* use the authconfig --nisserver=<NIS SERVER> --nisdomain=<NIS DOMAIN> -- update Example: authconfig --niserver=192.168.0.254 --nisdomain=RHCE --update or system-config-authentication
* Click on Enable NIS
* Type the NIS Domain: RHCE
* Type Server 192.168.0.254 then click on next and ok
* You will get a ok message.
* Create a Directory /rhome/stationx where x is your station number.
* vi /etc/auto.master and write at the end of file /rhome/stationx /etc/auto.home --timeout=60
* vi /etc/auto.home and write
* -rw,soft,intr 192.168.0.254:/rhome/stationx/&
Note: please specify your station number in the place of x.
* Service autofs restart
* Login as the nisuser2001 or nisuser2002 on another terminal will be Success. According to question, RHCE domain is already configured. We have to make a client of RHCE domain and automatically mount the home directory on your system. To make a member of domain, we use the authconfig with option or system-config authentication command. There a are lots of authentication server i.e NIS, LDAB, SMB etc. NIS is a RPC related Services, no need to configure the DNS, we should specify the NIS server address.
Here Automount feature is available. When user tried to login, home directory will automatically mount. The automount service used the /etc/auto.master file. On
/etc/auto.master file we specified the mount point the configuration file for mount point.
質問 # 65
/ var / tmp / fstabのアクセス許可を構成します
ファイル/ etc / fstabを/ var / tmp / fstabにコピーします。 / var / tmp / fstabの許可を構成して、次のようにします。
ファイル/ var / tmp / fstabの所有者はrootユーザーです。
ファイル/ var / tmp / fstabはグループルートに属します。
ファイル/ var / tmp / fstabは、誰でも実行可能ではありません。
ユーザーnatashaは、/ var / tmp / fstabを読み書きできます。
ユーザーharryは、/ var / tmp / fstabの書き込みも読み取りもできません。
他のすべてのユーザー(現在または将来)は/ var / tmp / fstabを読み取ることができます。
正解:
解説:
see explanation below.
Explanation
* cp -a /etc/fstab /var/tmp
* cd /var/tmp
* ls -l
* getfacl /var/tmp/fstab
* chmod ugo-x /var/tmp/fstab
[ No need to do this, there won't be execute permission for the file by default]
# setfacl -m u:natasha:rw /var/tmp/fstab # setfacl -m u:harry:0 /var/tmp/fstab(zero)
[Read permission will be there for all the users, by default. Check it using ls -l /var/tmp/fstab] Verify by
[ ls -la /var/tmp/fstab]
質問 # 66
パート2(Node2サーバー上)
タスク1 [ブートプロセスの制御]
起動プロセスを中断し、rootパスワードをリセットします。システムにアクセスするには、kexdramsに変更してください
正解:
解説:
* 1. Reboot the server pressing by Ctrl+Alt+Del
2. When the boot-loader menu appears, press the cursor keys to highlight the default boot-loader entry
3. Press e to edit the current entry.
4. Use the cursor keys to navigate to the line that starts with linux.
5. Press End to move the cursor to the end of the line.
6. Append rd.break to the end of the line.
7. Press Ctrl+x to boot using the modified configuration.
8. At the switch_root prompt
* switch_root:/# mount -o remount,rw /sysroot
switch_root:/# chroot /sysroot
sh-4.4# echo kexdrams | passwd --stdin root
Changing password for user root.
passwd: all authentication tokens updated successfully.
sh-4.4# touch /.autorelabel
sh-4.4# exit; exit
* Type exit twice to continue booting your system as usual.
質問 # 67
文字列を検索する
/ usr / share / dict / words内に文字列seismicを含むすべての列を見つけ、元の順序でこれらすべての列を/root/lines.txにコピーします。空白行はありません。すべての列は、元の列。
正解:
解説:
see explanation below.
Explanation
grep seismic /usr/share/dict/words> /root/lines.txt
質問 # 68
ホストアカウントの確認モードとパスワードをLDAPとして構成します。また、ldapuser40を介して正常にログインできます。パスワードは「パスワード」として設定されます。
また、証明書はhttp://ip/dir/ldap.crtからダウンロードできます。ユーザーがログオンした後、次の質問でautofsを構成しない限り、ユーザーにはホストディレクトリがありません。
正解:
解説:
see explanation below.
Explanation
system-config-authentication
LDAP Server: ldap//instructor.example.com (In domain form, not write IP) OR
# yum groupinstall directory-client (1.krb5-workstation 2.pam-krb5 3.sssd)
# system-config-authentication
1.User Account Database: LDAP
2.LDAP Search Base DN: dc=example,dc=com
3.LDAP Server: ldap://instructor.example.com (In domain form, not write IP) 4.Download CA Certificate
5.Authentication Method: LDAP password
6.Apply
getent passwd ldapuser40
質問 # 69
カーネルをアップグレードし、デフォルトで新しいカーネルを起動します。このアドレスからのカーネルのダウンロード:
ftp://server1.domain10.example.com/pub/update/new.kernel
正解:
解説:
see explanation below.
Explanation
Download the new kernel file and then install it.
[root@desktop8 Desktop]# ls
kernel-2.6.32-71.7.1.el6.x86_64.rpm
kernel-firmware-2.6.32-71.7.1.el6.noarch.rpm
[root@desktop8 Desktop]# rpm -ivh kernel-*
Preparing... ###########################################
[100%]
1:kernel-firmware
########################################### [ 50%]
2:kernel
########################################### [100%]
Verify the grub.conf file, whether use the new kernel as the default boot. [root@desktop8 Desktop]# cat
/boot/grub/grub.conf default=0
title Red Hat Enterprise Linux Server (2.6.32-71.7.1.el6.x86_64)
root (hd0,0)
kernel /vmlinuz-2.6.32-71.7.1.el6.x86_64 ro root=/dev/mapper/vol0-root rd_LVM_LV=vol0/root rd_NO_LUKS rd_NO_MD rd_NO_DM LANG=en_US.UTF-8 SYSFONT=latarcyrheb-sun16 KEYBOARDTYPE=pc KEYTABLE=us crashkernel=auto rhgb quiet initrd /initramfs-2.6.32-71.7.1.el6.x86_64.img
質問 # 70
ホスト名、IPアドレス、ゲートウェイ、およびDNSを構成します。
ホスト名:dtop5.dn.ws.com
IPアドレス:172.28.10.5/4
ゲートウェイ:172.28.10.1
DNS:172.28.10.1
正解:
解説:
Configure Host Name
vim /etc/sysconfig/network NETWORKING=yes HOSTNAME=dtop5.dn.ws.com GATEWAY=172.28.10.1
2. Configure IP Address, Gateway and DNS
Configure the network by Network Manager: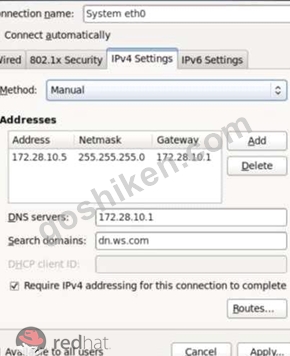
Note: Please remember to choose two options:
Connect automatically
Available to all users
Click "Apply", save and exit, and restart your network services:
# Service network restart
3. Validate these profiles:
a) Check gateway: # vim / etc / sysconfig / network
NETWORKING=yes
HOSTNAME=dtop5.dn.ws.com
GATEWAY=172.28.10.1
b) Check Host Name: # vim /etc/hosts
c) Check DNS: # vim /etc/resolv.conf
# Generated by NetworkManager
Search dn.ws.com
Nameserver 172.28.10.1
d) Check Gateway: # vim /etc/sysconfig/network-scripts/ifcfg-eth0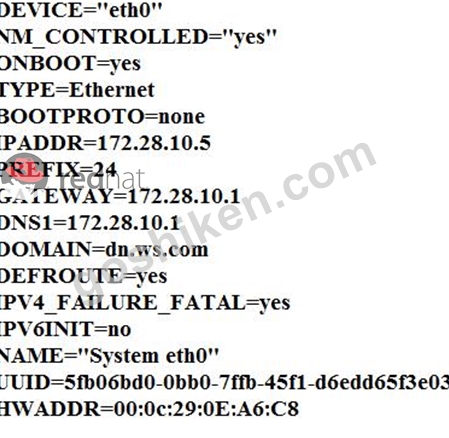
質問 # 71
ユーザー、ユーザーグループ、およびグループメンバーを作成するための次の要件に従ってください。
-adminという名前のグループ。
-maryという名前のユーザー。セカンダリグループとしてadminに属します。
-aliceという名前のユーザー。セカンダリグループとしてadminに属します。
-bobbyという名前のユーザー、bobbyのログインシェルは非対話型である必要があります。 Bobbyはセカンダリグループとしてadminに属していません。
Mary、Alice、bobbyユーザーは、ユーザーのパスワードとして「password」を設定する必要があります。
正解:
解説:
see explanation below.
Explanation
groupadd admin
useradd -G admin mary
useradd -G admin alice
useradd -s /sbin/nologin bobby
echo "password" | passwd --stdin mary
echo "password" | passwd --stdin alice
echo "password" | passwd --stdin bobby
質問 # 72
次のようにautofsを構成して、LDAPユーザーのホームディレクトリを自動マウントします。
host.domain11.example.comは、システムに/ homeをNFSエクスポートします。
このファイルシステムには、ユーザーldapuser11の事前設定されたホームディレクトリが含まれています。ldapuser11のホームディレクトリはhost.domain11.example.com / rhome / ldapuser11です。ユーザーldapuser11のパスワードは「password」です。
正解:
解説:
see explanation below.
Explanation
* vim /etc/auto.master /rhome /etc/auto.misc
wq!
# vim /etc/auto.misc
ldapuser11 --rw,sync host.domain11.example.com:/rhome/ldpauser11 :wq!
#service autofs restart
* service autofs reload
* chkconfig autofs on
* su -ldapuser11
Login ldapuser with home directory
# exit
質問 # 73
ftp://instructor.example.com/pub/testfileからドキュメントをダウンロードし、[abcde]を含むすべての行を見つけて/ MNT / answerドキュメントにリダイレクトし、元のコンテンツに従って順序を並べ替えます。
正解:
解説:
see explanation below.
Explanation
Download the file to /tmp first
grep [abcde] /tmp/testfile > /mnt/answer
質問 # 74
パート1(Node1サーバー上)
タスク1 [ネットワークの管理]
提供された値を使用して、既存のインターフェース(enp1s0)との新しいネットワーク接続を作成してください。
IPv4:172.25.X.10 / 255.255.255.0(Xはドメイン番号:Domain15)ゲートウェイ:172.25.X.2 DNSサーバー:172.25.X.2次のセカンダリIPアドレスを現在実行中の接続に静的に追加します。既存の設定を損なうことのない方法でこれを行います。
IPv4:10.0.0.5/24およびホスト名node1.domain15.example.comを設定します
正解:
解説:
* [root@node1 ~]# nmcli connection show
[root@node1 ~]# nmcli connection add con-name static ifname enp1s0 type ethernet ipv4.addresses 172.25.15.10/24 ipv4.gateway 172.25.15.2 ipv4.dns 172.25.15.2
[root@node1 ~]# nmcli connection modify static ipv4.method manual connection.autoconnect yes
[root@node1 ~]# nmcli connection modify static +ipv4.addresses 10.0.0.5/24
[root@node1 ~]# nmcli connection up static
[root@node1 ~]# nmcli connection show
[root@node1 ~]# hostnamectl set-hostname node1.domain15.example.com
[root@node1 ~]# hostnamectl status
[root@node1 ~]# nmcli connection down static
* [root@node1 ~]# nmcli connection up static
[root@node1 ~]# ip addr show
[root@node1 ~]# reboot
### For checking ###
[root@node1 ~]# ip addr show
[root@node1 ~]# netstat -nr
[root@node1 ~]# cat /etc/resolv.conf
質問 # 75
タスクを構成します。毎日14:23にecho "file"コマンドを実行するように計画します。
正解:
解説:
(a) Created as administrator
# crontab -u natasha -e
23 14 * * * /bin/echo "file"
(b)Created as natasha
# su - natasha
$ crontab -e
23 14 * * * /bin/echo "file"
質問 # 76
cronタスクを構成します。
ユーザーnatashaはcronジョブを設定する必要があります。現地時間14:23が実行され、実行されます:* / bin / echo hiya毎日。
正解:
解説:
see explanation below.
Explanation
crontab -e -u natasha
23 14/bin/echo hiya
crontab -l -u natasha // view
systemctlenable crond
systemcdlrestart crond
質問 # 77
構成、設定
Webサービスは、http://instructor.example.com/pub/serverX.htmlからダウンロードします。また、システムの再起動後もサービスが実行されている必要があります。
正解:
解説:
cd /var/www/html
wget http://instructor.example.com/pub/serverX.html mv serverX.html index.html /etc/init.d/httpd restart chkconfig httpd on
質問 # 78
次の要件に従って新しい論理ボリュームを作成します。
論理ボリュームはdatabaseという名前で、データストアボリュームグループに属し、サイズは50エクステントです。
データストアボリュームグループの論理ボリュームのエクステントサイズは16 MBである必要があります。
ext3ファイルシステムで新しい論理ボリュームをフォーマットします。
論理ボリュームは、システムの起動時に/ mnt / databaseの下に自動的にマウントされる必要があります。
正解:
解説:
see explanation below.
Explanation
fdisk -cu /dev/vda
partx -a /dev/vda
pvcreate /dev/vdax
vgcreate datastore /dev/vdax -s 16M
lvcreate-l 50 -n database datastore
mkfs.ext3 /dev/datastore/database
mkdir /mnt/database
mount /dev/datastore/database /mnt/database/ df -Th
vi /etc/fstab
/dev/datastore /database /mnt/database/ ext3 defaults 0 0 mount -a
質問 # 79
サイズ100MBのパーティションを1つ作成し、データにマウントします。
正解:
解説:
see explanation below.
Explanation
1. Use fdisk /dev/hda to create new partition.
2. Type n For New partitions.
3. It will ask for Logical or Primary Partitions. Press l for logical.
4. It will ask for the Starting Cylinder: Use the Default by pressing Enter Key.
5. Type the Size: +100M you can specify either Last cylinder of size here.
6. Press P to verify the partitions lists and remember the partitions name.
7. Press w to write on partitions table.
8. Either Reboot or use partprobe command.
9. Use mkfs -t ext3 /dev/hda?
OR
mke2fs -j /dev/hda? To create ext3 filesystem.
vi /etc/fstab
Write:
/dev/hda? /data ext3 defaults 1 2
Verify by mounting on current Sessions also: mount /dev/hda? /data
質問 # 80
vg0の下にlv1という名前の論理ボリュームが1つ作成されます。その論理ボリュームの初期サイズは100MBです。ここで、サイズ500MBが必要になりました。データを失うことなく、論理ボリューム500Mのサイズを正常に作成します。オンラインでサイズを増やす必要があります。
正解:
解説:
The LVM system organizes hard disks into Logical Volume (LV) groups. Essentially, physical hard disk partitions (or possibly RAID arrays) are set up in a bunch of equal sized chunks known as Physical Extents (PE). As there are several other concepts associated with the LVM system, let's start with some basic definitions:
Physical Volume (PV) is the standard partition that you add to the LVM mix. Normally, a physical volume is a standard primary or logical partition. It can also be a RAID array.
Physical Extent (PE) is a chunk of disk space. Every PV is divided into a number of equal sized PEs. Every PE in a LV group is the same size. Different LV groups can have different sized PEs.
Logical Extent (LE) is also a chunk of disk space. Every LE is mapped to a specific PE.
Logical Volume (LV) is composed of a group of LEs. You can mount a file system such as /home and /var on an LV.
Volume Group (VG) is composed of a group of LVs. It is the organizational group for LVM. Most of the commands that you'll use apply to a specific VG.
Verify the size of Logical Volume: lvdisplay /dev/vg0/lv1
Verify the Size on mounted directory: df -h or df -h mounted directory name Use: lvextend -L+400M /dev/vg0/lv1 ext2online -d /dev/vg0/lv1 to bring extended size online.
Again Verify using lvdisplay and df -h command.
質問 # 81
......
有効な問題最新版を試そうEX200日本語テスト解釈EX200日本語有効な試験ガイド:https://www.goshiken.com/RedHat/EX200-JPN-mondaishu.html